
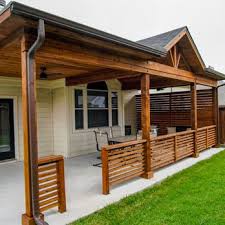
Hey there, Dallas homeowner. If you’ve ever tried to enjoy your backyard in July, you know the Texas sun doesn’t play around. A solid patio cover isn’t just a luxury it’s a survival tool. I’ve been designing and installing patio covers across DFW for over five years, and I’ve seen firsthand how the right cover transforms a blazing slab of concrete into a shady retreat you’ll actually use. This guide walks you through the entire process, from grabbing a permit to driving the last screw, in plain, no-nonsense language. Whether you’re thinking DIY or just want to understand what a contractor will do, I’ve got you.
1. Nail the Paperwork First: Dallas Patio Cover Permits & Codes
Before you buy a single board, let’s talk rules. In the City of Dallas, most attached patio covers need a building permit. Freestanding structures over 200 square feet typically do, too. Start at the City of Dallas Development Services website, or give them a call. They’ll want a site plan showing your property lines, the cover’s dimensions, and how it attaches to your home. Don’t skip this code enforcement here is no joke. If you’re in a neighborhood with an HOA, check their guidelines separately. Some HOAs have strict rules about roof colors, materials, or even the direction the cover faces. Trust me, it’s way easier to tweak a plan on paper than to tear down finished work.
Why this matters for Dallas: Our soil expands and contracts like crazy. Codes require deep enough footings to keep your cover from shifting during our wet-dry cycles. So the permit process isn’t just red tape; it’s your insurance against a leaning patio cover two summers from now.
2. Pick the Right Material for That North Texas Heat
You’ve got three main players in patio cover materials around here, and each handles the Dallas climate differently.
-
Aluminum Patio Covers Hands down the most popular. They don’t rust, they’re lightweight, and modern insulated aluminum panels actually cut down on the heat radiating down. Many Dallas contractors recommend them because they stand up to hail season without denting too easily. Look for a baked-on enamel finish so the color doesn’t fade under our relentless UV.
-
Wood Patio Covers Beautiful, custom, and a lot more work. Cedar and pressure-treated pine are common, but you’ll need to seal them every year or two. Our humidity swings can warp wood if it’s not properly treated. They also require more structural framing, which can bump up cost and installation time.
-
Vinyl or Composite Low maintenance, won’t rot, and the hollow profiles can be reinforced. Not as common for full patio roofs in Dallas, but solid if you want a clean, modern look and don’t mind the slightly higher upfront price.
-
Insulated Patio Panels My personal favorite for any Dallas patio cover installation. These sandwich a foam core between aluminum skins. They block heat so effectively, the temperature under your cover can feel 10–15° cooler. That’s a game-changer when it’s 102° outside.
If you’re ever unsure, drive around some established Dallas neighborhoods like Lakewood or Preston Hollow. You’ll see what materials survive and still look good five years later. That’s real-world testing.
3. Design That Makes Sense (and Actually Fits Your Home)
A patio cover isn’t a one-size-fits-all kit. Your design needs to match your house’s style and your family’s habits.
Attached vs. Freestanding: An attached patio cover ties into your home’s exterior wall with a ledger board. It feels like a natural extension of the house and is often more stable. Freestanding covers sit away from the house and can be placed anywhere in the yard great if you want to cover a poolside area without messing with the house’s eaves.
Roof Style: In Dallas, a gable roof (the classic upside-down V) adds tremendous ventilation and a sense of height. A flat or shed roof slopes away from the house to shed rainwater, which is critical given our sudden downpours. A pergola-style cover with open slats gives you dappled shade and is perfect for growing vines, but don’t count on it to keep you dry during a gullywasher.
Orientation: Always think about afternoon sun. In Dallas, the west side of your house gets absolutely hammered from 3 p.m. to sunset. If you’re covering a west-facing patio, consider a solid insulated roof and maybe even a vertical shade panel or drop-down screen on that side.
4. Step-by-Step Installation (For the DIY Minded, with a Heavy Dose of Reality)
I’ll outline the basic steps, but keep in mind that a full patio cover installation in Dallas can be physically demanding and requires at least two people. If you hit any point that feels sketchy, call a pro.
Step 1 – Gather Tools & Materials
You’ll need a hammer drill, circular saw, level, chalk line, ladders, concrete mix, post anchors, lag bolts, flashing tape, and all the framing lumber or aluminum components. Rent a concrete mixer if you’re pouring multiple footings. Don’t cheap out on the ledger board; it literally holds everything up.
Step 2 – Mark Your Layout
Snap a level chalk line on the house where the ledger board will sit. Account for the roof slope minimum ¼ inch per foot away from the house is the rule, but in a storm-prone area like Dallas, I bump that to 3/8 inch per foot. Mark post locations so the roof overhang doesn’t cross your property line (setback rules!).
Step 3 – Install the Ledger Board
Remove siding if needed and bolt the pressure-treated ledger board straight into the house’s framing studs or rim joist never just into brick veneer. Tuck metal flashing under the existing siding or stucco and lap it over the top of the ledger. This channel keeps water from sneaking behind the board and rotting your wall.
Step 4 – Set Posts & Footings
In Dallas, we don’t have a deep frost line, but your footings still need to go at least 12–18 inches deep and be wider than the post, often 12 inches in diameter. Use concrete with post anchors embedded while it’s wet. Let it cure fully—two days minimum before you put any weight on it. Your future self will thank you when the ground swells after spring rains and those posts stay dead level.
Step 5 – Build the Roof Frame
Attach beams on top of the posts, then run rafters from the ledger board to the beam. For aluminum systems, this is a carefully engineered kit that clicks together. For wood, you’ll toenail or use hurricane ties. Dallas is in a wind zone where uplift can tear a cover off the house. Hurricane ties and proper ledger anchoring aren’t optional they’re part of the code.
Step 6 – Roof Panels & Trim
Install your roof material. If you’re using insulated panels, they interlock and screw down to the rafters. Solid corrugated metal needs closures at the ends to keep out pests. Pay special attention to the house connection: slide the panels under the flashing you installed earlier, so water flows onto the panels and away.
Step 7 Final Inspection & Touch-Ups
Once everything is built, call for your city inspection if one was required. After you pass, caulk all exposed screw heads, touch up any scratched paint, and run a hose over the roof to confirm water runs off exactly where you planned—away from the foundation.
5. Sneaky Mistakes Even Smart People Make
-
Ignoring drainage slope. A flat patio cover becomes a wading pool, then a waterfall right at your back door.
-
Attaching to brick without proper anchors. Brick veneer alone can’t hold a ledger. You must hit the structural wall behind it.
-
Underestimating wind. Look up “Dallas microburst.” Enough said.
-
Skipping the footer depth. Shallow posts heave and shift, leading to wavy rooflines.
-
Not communicating with the HOA. I’ve seen entire installations redone because the color was half a shade off.
6. What Does a Patio Cover Cost in Dallas? (Real Numbers)
Cost is the elephant on the patio. On average, a professionally installed aluminum patio cover in Dallas runs between $6,000 and $15,000 for a typical 200–300 square foot project, depending on material, complexity, and whether you add electrical or fans. Wood can edge higher, especially with custom carpentry. DIY materials alone for a basic wood cover might cost $2,000–$4,000, but factor in tool rental, your time, and the risk of a redo.
Permit fees usually add $100–$300. A structural engineer’s stamp (sometimes required) is another $300–$600. When you’re gathering quotes, ask for a line-item breakdown. Legitimate Dallas patio cover contractors won’t blink at that request.
7. Know When to Call a Dallas Patio Cover Contractor
There’s no shame in hiring a pro. In fact, if your design involves multiple angles, heavy materials like tile, or requires tying into a complicated roof valley, the cost of an expert is well worth avoiding leaks and collapses. Look for a contractor with local references, general liability insurance, and a track record of navigating Dallas permit processes. Ask to see photos of installations that are at least three years old. If they still look solid, you’ve found someone who builds for our climate.
And for what it’s worth, a skilled crew can knock out a standard attached cover in two to three days without you sweating through four weekends and a couple of arguments with your brother-in-law.
Conclusion
A patio cover in Dallas is more than a backyard upgrade; it’s a cooler, safer way to enjoy the outdoor space you already have. Whether you’re the DIY type or you’re ready to bring in a team, starting with a solid plan, the right permits, and materials meant to handle Texas extremes will make all the difference. Take the steps one at a time, trust the process, and before you know it, you’ll be sipping iced tea in the shade while the sun does its worst overhead. You’ve got this.